Page 9 of 11
Re: Jowett Kestrel Rebuild & Restoration
Posted: Sat Dec 12, 2015 6:49 pm
by Tony Fearn
julian wrote:Looking at the back of the rear lower panel, can ayone advise what the brackets attach to & should the bracket be bent over as in the picture?
It's looking good now Julian.
Sorry I can't help with the bracket query. It seems to be model specific.
Good to see Mary and yourself at the Northern Section Christmas lunch. I hoped you enjoyed the camaraderie.
All the best for Christmas,
Tony.
Re: Jowett Kestrel Rebuild & Restoration
Posted: Sun Dec 13, 2015 11:58 pm
by richard turner
From what I remember the rear inner wheel arch panel encloses the timber and all at the rear. The wing just acts as a mud trap to encourage rust. I have no recollection of the brackets shown on the inner bottom panel and feel they may be an addition. Rich. Ps Will have a look for window mechanisms and glass when and if ever it stops raining!
Re: Jowett Kestrel Rebuild & Restoration
Posted: Mon Dec 14, 2015 12:46 am
by Tony Fearn
Julian wrote:I would be very interested if you have the glass for the front windows as one of mine is broken and the other is missing.
Hello again Julian.
If you have a complete broken front window, then of course you'll have a pattern for the o/s and the n/s as there's no 'hand'. If you go for having new laminated windows made, make sure that their thickness will run in the window channels.
I replaced the windscreen in 'Mary Ellen' (1934) on her first re-incarnation in 1979 with a laminated screen as her original one was only plate glass!!
I had a set of side windows made for 'Sarah Jane', the 1933 Flying Fox, and had to have them re-made because the first lot were too thick.
As for the window mechanisms, perhaps the driver's side will have much more use than the passenger side, so a belt and braces approach would give it longevity.
Tony.
Re: Jowett Kestrel Rebuild & Restoration
Posted: Fri Dec 18, 2015 12:11 pm
by ian Howell
Tony is right (Is he ever wrong!?).
I had to have new glass all round in my 1830 Fabric Saloon and I had a choice of 6.5mm or 4.5mm.
I went for 6.4mm as it looked much stronger but as Tony points out, it is pretty tight in the window channels - and these are well-worn anyway. It seems to be right though for the windscreen frame.
So it would appear that 4.5mm may be the better option. The snag is that strangely this is about 50% dearer than the 6.5mm glass.
Get the edges polished when they are cut and if you are doing the fixed glasses (windscreen, rear window, front fixed panels) then varnish the edges before fitting to prevent long-term degradation of the laminate.
Incidentally, the original glass in my car was made by 'Splintex'. They only started business in 1930 so I guess mine must have been some of the first. I have one lamination only left, but it has the 'Splintex' trade mark.
Re: Jowett Kestrel Rebuild & Restoration
Posted: Wed Dec 23, 2015 9:42 pm
by julian
Thanks Tony, Ian & Rich
The glass that was fitted measures 4.2mm, so the 4.5mm laminated sounds right. I need to get new guide channels as most are either badly worn or missing, so I'll make sure this is suitable for the glass.
I think you are right Tony, about the driver's side mechanism being more robust and also it has a 2 point support for the glass. I still don't know if there is a channel that the glass sits in and what this looks like, but hopefully Rich might be able to help with that when the rain stops - amazingly it did today, but it probably won't last!
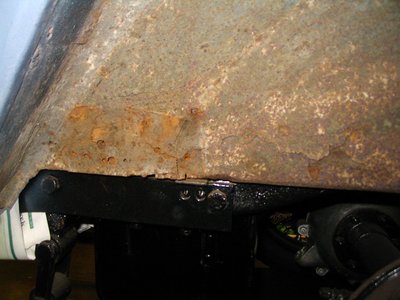
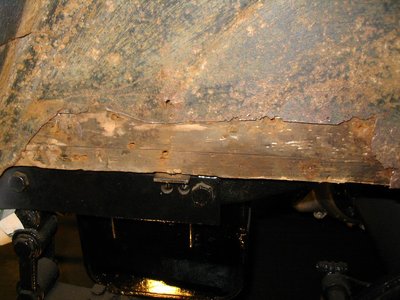
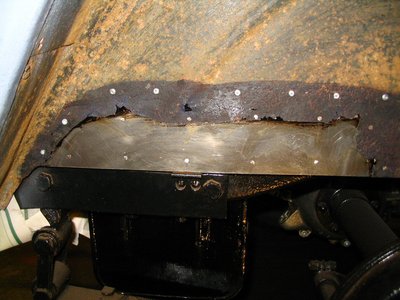
I've been moving on with repairs to the RHS rear wheel arch. I cut out some of the rusted metal and made a "patch" which was nailed & pop-riveted in place - see pictures below:

- Before

- Rotten metal removed

- New piece in place
Still some more to do, but it's a start..
Re: Jowett Kestrel Rebuild & Restoration
Posted: Wed Dec 23, 2015 10:16 pm
by julian
Today I started looking at the rear section of the wheel arch and the outer body panel. It wasn't vert clear at first how the panels were shaped & how they came together. I then remembered I had numerous photos of John Follows' car which I took at the Rally this year. I temporarily fitted the mudguard and then took a similar picture to the one I had of John's car:-
So it's fairly clear now that the panels need extending more than I originally thought and that the centre rear panel has been cut back, presumably as part of an earlier "restoration".
It would be really useful to get a measurement of the rear panel from the top to the bottom - mine currently measures 8" and now I look more closely I can see that it has been cut back and folded over to form a new edge. It would probably be best to extend this panel first to get a reference point for the other repairs; so if anyone that has a Kestrel of this vintage and could make a quick measurement I'd very much appreciate it!

Re: Jowett Kestrel Rebuild & Restoration
Posted: Fri Feb 19, 2016 9:13 pm
by julian
I've now been able to obtain the depth of the rear panel (13 3/8"); many thanks to John Follows for allowing me to look around his with a tape measure. I also found out that the fixing bracket on the rear panel lines up with a right-angle bracket mounted on the timber frame in this area, and the 2 are fixed together with a bolt, so another mystery solved.
Over the last couple of months I've been working on and off at trying to repair the tail end of the wheel arches, which has not been the easiest of tasks, particularly as body repairs are not my area of expertise! I started out making a cardboard template for the top and bottom repair panels and then cut out an shaped these in 20swg steel (maybe I should have gone for 22swg to ease the bending)
The photo below shows the 2 repair panels for the RHS:
.. followed by the lower panel riveted in place:
..and then the upper panel riveted in place and an extension to the wood frame:
Re: Jowett Kestrel Rebuild & Restoration
Posted: Fri Feb 19, 2016 9:22 pm
by julian
I then shaped and fitted further wood strips to frame the repair and applied filler over the join & rivets:
Still more finish off and the strip along the joint to replace, but heading in the right direction
The contour is not quite the same as the mudguard, but when the beading is fitted, hopefully it won't be too noticeable. I've carried out the same work on the other side, but I'm having more trouble getting the shape right!!
Re: Jowett Kestrel Rebuild & Restoration
Posted: Fri Apr 22, 2016 10:01 pm
by julian
It's been a while since my last post, and although the restoration has lost a bit of impetus, it is still progressing!
The work has been focussed on the bodywork namely:
1. Rear wheel arch repairs - more filling & rubbing down
2. Rear body panel - manufacturing and attaching an extension to the original cut-down panel
3. Carefully removing the rear inside arm rests to access the wheel arches for de-rusting & painting
4. Repairs to the bonnet to re-attach the broken hinge "loops"
5. Finalising repairs and filling front driver's door
6. Making wooden blocks to screw down the rear of the body (screws loose and not accessible) and fitting rear plywood panel.
Pictures here and in the following posts.
Re: Jowett Kestrel Rebuild & Restoration
Posted: Fri Apr 22, 2016 10:10 pm
by julian
Painted wheel arch
Repaired rear panel - repair panel MIG plug welded in place
Re: Jowett Kestrel Rebuild & Restoration
Posted: Fri Apr 22, 2016 10:15 pm
by julian
Repairs to lower edge of front drivers door:
Re: Jowett Kestrel Rebuild & Restoration
Posted: Fri Apr 22, 2016 10:19 pm
by julian
Repairs to bonnet top hinge:
Re: Jowett Kestrel Rebuild & Restoration
Posted: Fri May 06, 2016 8:37 pm
by julian
Another repair to one edge of a bonnet side panel that had been (annoyingly) cut-away. May have been rusty, but I suspect was a modification to fit the profile of the wrong wings supplied with the car! Fortunately only one side had been attacked!
The tedious job of multiple sequences of filling/spraying primer/sanding has occupied the last few days and I think I am nearing as good as I'm going to get/have the patience to do. There are still a few marks on the bonnet, but I can justify this with the age of the car & I don't want it looking like new (I know, that's a cop-out!)
Picture below of work in progress on the bonnet & rear panel
Re: Jowett Kestrel Rebuild & Restoration
Posted: Sat May 07, 2016 6:47 pm
by Forumadmin
You will always regret not doing that prep before the paint job!

Re: Jowett Kestrel Rebuild & Restoration
Posted: Sun Jun 19, 2016 9:27 pm
by julian
Since my last post work has concentrated on repairs to the right hand side front wing and learning how to use a MIG welder with a little help from my friends! I'm still not proficient and some of the welds don't look very pretty, but I've managed to patch over most of the rusted sections as the photos below indicate:
I've now started filling over the patches and the wing is slowly taking shape - it's going to need a fair bit of time still, but should be possible & I'll post more photos once its finished & primed.
The left hand wing is going to take more work and is a mere shell of what it used to be and welding may not be possible. If so I may have to resort to combination of bonding metal patches & fibreglass over the whole of the inside!